Google Groups Management for Group Owners
Introducing Email Lists in Google Groups
Settings and Documentation
Email lists now run on Google Groups instead of Mailman. This change is an effort to modernize campus mailing lists and integrate them with the other tools in the Oxy Google Workspace.
You may continue to use the email lists in the same way as you’ve used lists in the past.
The only visible changes for the senders and receivers of messages is that list addresses will now end in “-g” instead of “-l” and senders do not get an automated email reply receipt as they did previously in Mailman.
List owners will now have greater visibility into their list membership and access to new features.
You can see the Groups you are part of at groups.google.com or by clicking on the 9 dots menu from inside any Google web app and clicking on Groups.
If you have any questions, please feel free to reach out to helpdesk@oxy.edu
How should you prepare for the change?
The biggest change is for Group administrators (“Owners”) and moderation. When possible, ITS will automate the Group members using Banner data. Ad-hoc lists not based on Banner data will be maintained by list Owners. List Owners will also be able to make the following changes:
Define Administrators
Owners & Managers: This role can add and remove members, change moderation and digest settings, and change member permissions. This role can also delete the group, but please note that with the Banner integration even a deleted group would be re-created automatically.
Managers: Managers are a step below owners. They can do everything an owner can do except for deleting the group. You may want to identify managers for the lists for each Group.
Read more about Roles in Google Groups.
Adjust Default Moderation Settings
By default, ITS has set the moderation settings to be the same as they were previously in mailman. This setting can then be manually adjusted on a per user basis. To find this setting, go to the Members list and use the drop down menu under “posting” to change moderation settings.

With this setting, Group Owners and Managers will receive an email notification for moderation of messages sent to the list and can choose to accept or reject the post.
Unlike the past, those whose messages are held for moderation will not receive a notification. This is how Groups works and is not a setting ITS or group Owners can change, unfortunately.
Get Familiar with Moderation Options
When a message is held for moderation, the Owner/Managers will receive an email notification. The sender will not receive a notification, which is a limitation of Groups.
To manage moderated messages, go to Google Groups, and on the left hand sidebar go to Conversations → Pending. From there you can approve or reject individual messages.
You also have the ability to set the author as an approved sender or to block the author from future messages.
Read more from Google on Approving and Rejecting
What New Features are Included?
Google Groups grants the group Owner more direct control over the group settings. You can access those settings in your Google Workspace by locating Google Groups in the nine-dot grid icon in the upper left of Google whenever you are logged in with your oxy.edu email address. Read more from Google on How to Access Group Settings and on Understanding the Settings.
Here are some common tasks Owners might want to do with email lists (now Groups):
Add another Manager for the Group
To add a Manager role for someone else, go to Google Groups and locate the Group in the list of Groups. Then in the left sidebar, select “People” from the menu and “Members.” This will produce a list of members in your list. If they are already on the list you can change their role. If they are not already on the list, click the button at the top of the list to add a new member. You can assign this person a higher role than a Member, if you like, by making them a Manager. You might then give the Manager privileges to add and remove members and moderate content. Read more about Roles in Google Groups.
Manually Add/Remove someone to the Group
To add someone as a Member to your list go to Google Groups and locate the Group in the list. Then in the left sidebar, select “People” from the menu and “Members.” This will produce a list of members in the Group. Click the button at the top of the list to add a new member. If you’d later like to remove this access, you can do so by selecting their name in the member list: click the checkbox to the left of their name in the list, then select this icon  .
.
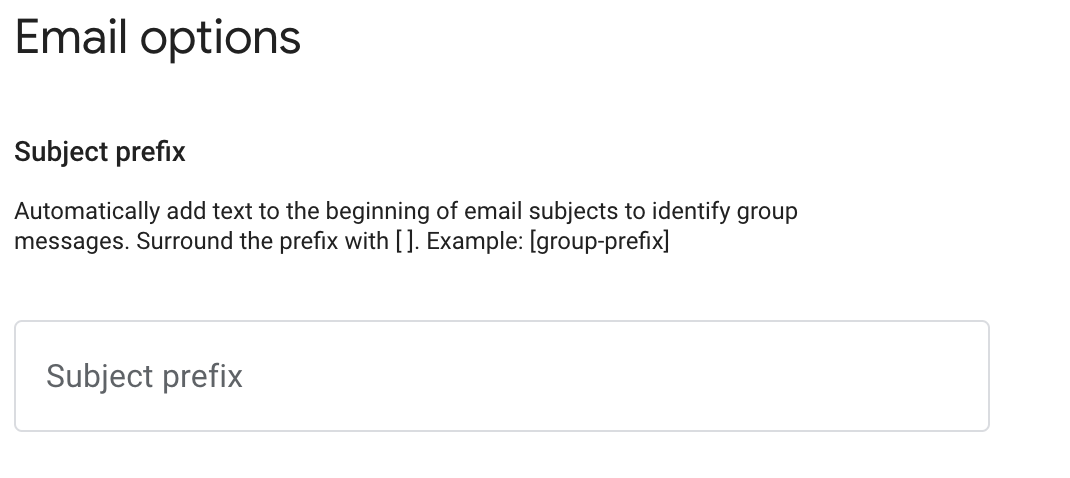
Prepend the Group name to the subject of all emails
Previously the list name was included by default in all emails sent to the list (e.g. [faculty-g] Subject of the Email). Google Groups does not do this by default, but if you’d like to re-create this type of subject line, you can do so under Email Options as pictured below:

What if I get stuck or the list does something unexpected?
Contact the helpdesk@oxy.edu