- Fortinet provides a Linux VPN client.
- If you are using Linux as your desktop/laptop operating system from off campus, but need access to resources provided via the Oxy VPN, then follow these instructions.
Download the FortiClient VPN installer
- Go to the Fortinet download page.
- Select the “Forticlient” tab at the top of the page, then scroll to the bottom section, with the heading “FortiClient VPN”
- Depending on the Linux distribution that you are using, download either the .rpm or .deb file.
- Select the .deb file if you are using a Debian distribution (ie. Ubuntu, Raspberry Pi OS, Linux Mint, etc.).
- Select the .rpm if you are using a distribution that derives from RedHat (RedHat, Fedora, CentOS, Oracle Linux, and openSuSE).
Install (example on Ubuntu, Raspberry Pi OS, Linux Mint, etc.)
- Find the installer file that you downloaded. In this case on Ubuntu 20, the file will be in your ~/Downloads folder.
- Using Terminal, run the installer and specify the file that you just downloaded. In this example, the file is forticlient_vpn_7.0.0.0018_amd64.deb
sudo apt install ~/Downloads/forticlient_vpn_7.0.0.0018_amd64.deb
- After authenticating using your user password to allow you to run the installer as root (sudo), the installer will probably ask you to install additional packages. Agree to that and wait for the installer to finish.
Building dependency tree
Reading state information... Done
Note, selecting 'forticlient' instead of '/home/ddell/Downloads/forticlient_vpn_7.0.0.0018_amd64.deb'
The following additional packages will be installed:
gconf-service gconf-service-backend gconf2-common libappindicator1
libdbusmenu-gtk4 libgconf-2-4
Suggested packages:
indicator-application
The following NEW packages will be installed:
forticlient gconf-service gconf-service-backend gconf2-common
libappindicator1 libdbusmenu-gtk4 libgconf-2-4
0 upgraded, 7 newly installed, 0 to remove and 48 not upgraded.
Need to get 909 kB/67.4 MB of archives.
After this operation, 299 MB of additional disk space will be used.
Do you want to continue? [Y/n] y
Install (example on RedHat/CentOS/Oracle Linux, etc.)
Configure FortiClient VPN (first time)
- Start the FortiClient VPN application using the GUI.

- Acknowledge and accept that the software does not have support.

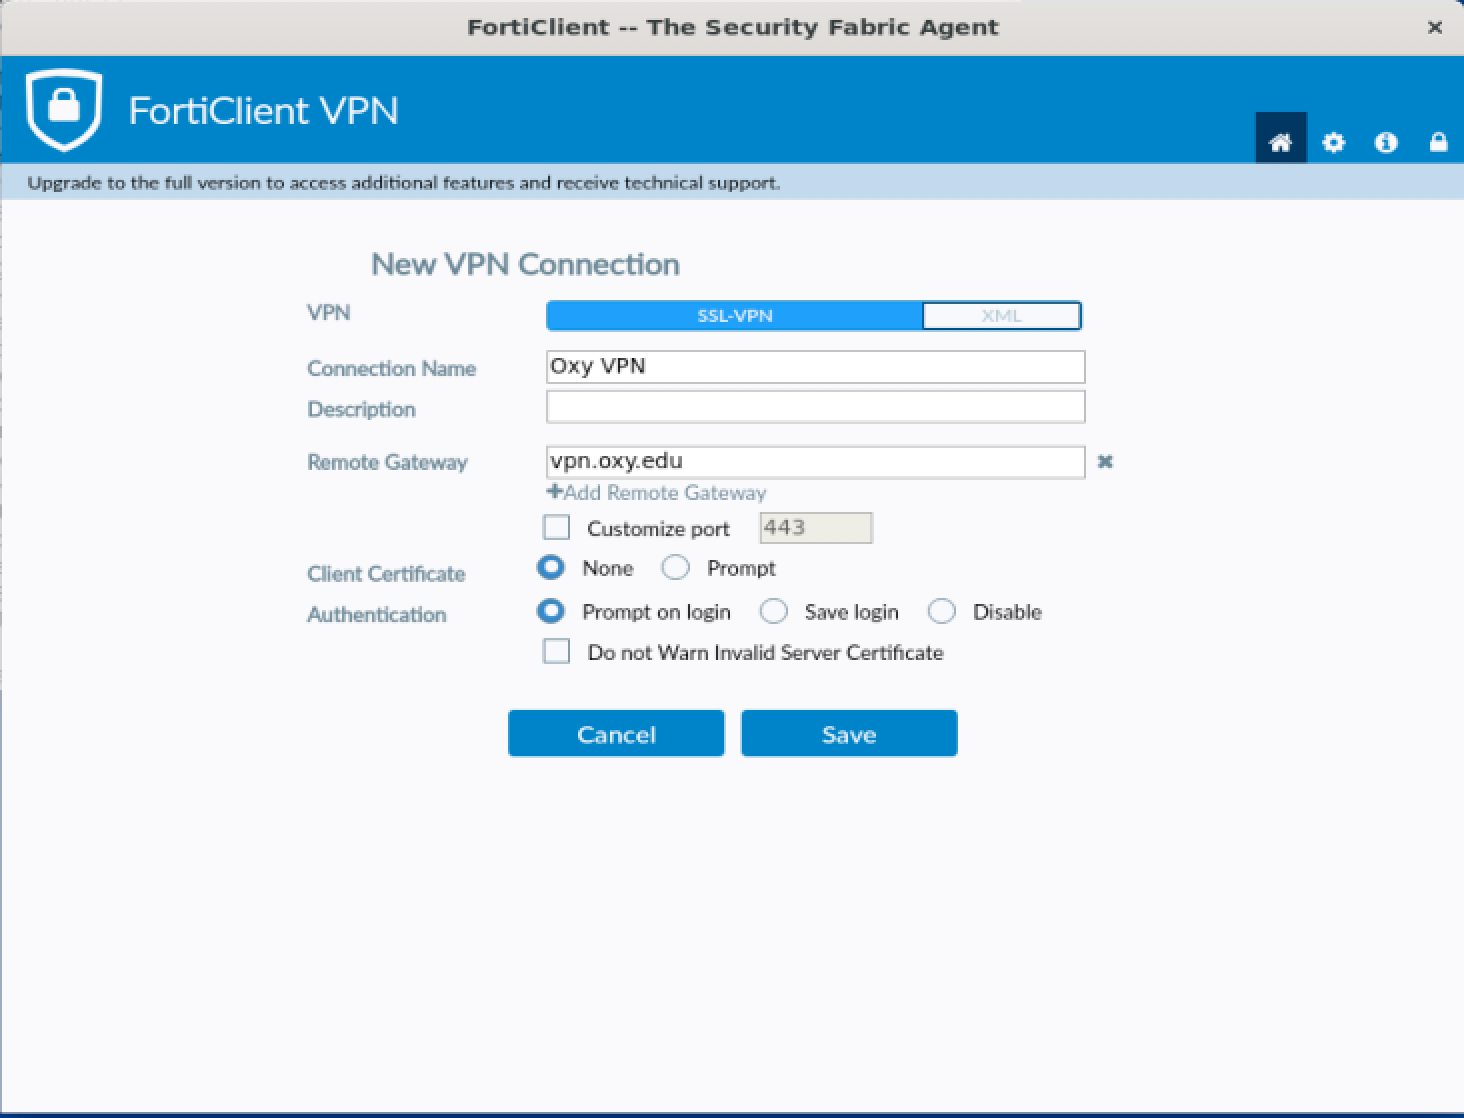
- Click on “Configure VPN” and fill out the New VPN Connection page:
-
VPN: Select SSL-VPN tab (it should be selected)
-
Connection name: Oxy VPN
-
Description: you can leave this field blank
-
Remote Gateway: vpn.oxy.edu

-
Customize port: leave checkbox unchecked (and just leave 443 as the value)
-
Client Certificate: None
-
Authentication: Your choice of these two:
- Select “Prompt on login” if you want to enter your Oxy username each time you login.
- Select “Save login” and enter your Oxy username so you don’t have to enter it each login
- Press the “Save” button.
Connect
- Start the FortiClient VPN application using the GUI.

- Enter your Username and Password. The username is your Oxy username, so the same as your email address, minus the “@oxy.edu”
You should see a “Connected” message. Once connected, you can close the FortiClient VPN application. Now you can use the network.